


I regret I didn't think about making this project into a tutorial until after I had finished the construction of the breastplate itself, as it would have made a good all-purpose "general construction of a breastplate" tutorial. (The steps to make this breastplate are as follows:)
(a) Hotglue 4 9"x12" sheets of 6mm thick craft foam together edge to edge to form a large sheet.
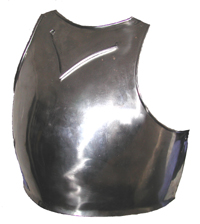
(b) Cut out a shape that roughly looks like this.
You'll have to measure yourself and try to get the shape so that it fits around the front half of your chest. This will, of course, be the front half of the breastplate. You're dealing with a flat shape here, and you want the piece to curve around your body. Now, if you were making a shape like this out of fabric (making a vest of sorts), you'd use a technique called darting to make the pattern fit the shape of your body. Here's a brief explanation of the technique as it pertains to clothing. You will be doing much the same thing in creating your breastplate, but instead of tucking up fabric, you'll cut small wedges out of the breastplate at the sides at chest level. You will then hotglue the edges of the wedges together. (Later, when you hotglue styrene sheeting over the foam to create the smooth, paintable surface, you will make a cut over the area where the dart is and overlap the plastic, hotgluing one edge under the other to make it conform to the shape of the foam underneath.) If my explanation seems a bit sketchy, I recommend you try making a mini-breastplate out of craft foam, and then take a piece of tagboard and drape it over the surface of the breastplate, seeing what the sheet does and also, what bits of it you'll have to trim, remove or overlap in order to make the tagboard cover the foam underneath.
Here's a picture which shows the location of the darts in the front of the breastplate:

Fortunately when you make the back of the breastplate, you won't need to put darts in, since the surface of your back will be a lot flatter (especially if you're a woman.) To make the back part of the breastplate, do the same as you did for the front - hotglue smaller sheets of 6mm thick craft foam to make one huge sheet and then cut the vest-like shape out of it. You'll notice, by looking at the picture above, that the front and back pieces are shaped differently (aside from the darting). The front piece has a much deeper neckline, for instance.
The breastplate will attach together at the sides and at the top of the "shoulder straps" --Eventually you'll put either buckles or snaps there to act as closures, but for now, while you're still figuring out the pattern of the breastplate, use masking tape to attach the front and back pieces together. Make sure they match up and fit your body closely. If you have to re-do the darting or trim some foam off of the sides or shoulder straps ( or attach MORE foam to the sides or shoulder straps) to make the breastplate fit you, then do so. ONLY after you've finished working out the pattern in foam do you then cover the breastplate with styrene sheeting. (For more info on how to glue styrene over foam, be sure to visit my Armormaking 101 Tutorial.)
Making a pattern for a breastplate is a project which takes a lot of trial and error. If you've had experience working with clothing/costume patterns, it will probably be easier for you since you'll be more familiar with garment pattern shapes. (Making armor is basically making a hard set of clothing...)
Okay, leaving behind the breastplate for now, we'll move onto the shoulder armor - which is basically a series of plates stacked upon each other which vary in size depending on where they are in the series.
We'll start with the lowest plate (the one closest to the elbow). We first draw a vague shape into the styrene like this. (Yes, unlike the breastplate part of the project, we start with the styrene first in this case, since we want to put a nice clean bend in it--you'll see what I mean in a moment. )

There needs to be a ridge in the center of the plate so draw a few lines where the plastic will be bent upwards...

Now cut the shape free of the styrene and bend it like so:

Now spread hotglue on the bottom of it and press it onto a large sheet of 3mm thick craft foam. Try to preserve the ridge as much as possible. Cut the shape free of the foam.

Congratulations. You've made the first plate. Now overlap another sheet of styrene over it and trace out the shape of the second piece, making it slightly wider (since we want the shoulder amor to grow wider towards the top.) Draw in the lines, cut out the shape and then bend it like so:

Hotglue it to a piece of foam and cut it free. Repeat the process...

...until you have made five graduated plates total.
Once the plates have been made, you have to then attach them to each other. If this were a piece of armor made from real metal plates, you'd rivet them together, but in this case, all you have to do is stitch them together with a needle and thread. (Make thread "x's" at the places indicated...)

Do NOT glue the plates together. You want the plates to only be connected by the threads, since this allows them some freedom of movement (which will make wearing the armor and moving about in it a LOT easier...) Oh, but you can't have those unslightly threads on the surface of the armor...
So take your glue gun and put a small dollop of hotglue over the crossed threads, hiding them (while creating a small rivet-looking thing in the process).

Here's what the shoulder armor looks like when the construction is finished...

And here's what it looks like after its been painted:

I spray-painted the first coat with glossy black paint, then I took a large brush and mixed black and silver testor's paint together. I stippled the mixture over the surface (using short rough strokes) to create the beat-up metallic-looking effect of used armor. I then put a small amount of pure silver on the end of the brush and dry brushed it across the ridges and over the rivets to make them stand out more.
I had to make two sets of shoulder armor, of course, and then I had to paint them both along with the breastplate.

You can see how I made the surface look all worn and beaten. (I put some silver across the pectoral region to make it stand out a little more and to give the armor some depth.) Anyway, when you make your armor, you'll have to experiment with different finishes and paintstrokes. Your only limit is your imagination.

I enjoyed this tutorial very much and I think it will be very helpful when I start making my armor. The only problem was that some of the picture links I don't see on here. I was wondering if you had taken them off or I just can't see them maybe?
ReplyDelete